Crib notes.
I have a semi-regular gig with “Think Bigger” delivering broadcast camera training to the people on Channel 4’s production training scheme. This year I had limited availability and only did half the week, training a lovely group of talented young women. My course focuses on giving them the confidence to go out there and get shooting. This year a couple of them asked for a checklist, to help them remember the main points in a shoot situation. I thought it might be helpful to share online:
RESEARCHER’S GUIDE: HOW TO FILM A CLASSIC “KEY INTERVIEW”
A “key” interview is the staple of a documentary, and forms the backbone of many a film. As a researcher / development person you may also be asked to film casting tapes of potential contributors. It is a great way to showcase your editorial skills and get the confidence of your colleagues.
This checklist runs through the technical side of this filming, assuming that you are working alone or with an unskilled assistant. It also assumes you have no lights, and are working on an entry-level broadcast camera such as a CanonXF305, but I’ve tried to make it applicable to other cameras such as the C300 or FS7.
BEFORE YOU SHOOT
- Remember to complete a full risk assessment before going on your shoot, and checking the kit thoroughly. In particular make sure you have BATTERIES and SD CARDS
- Equip yourself with an instruction manual for the camera – even if you’ve used it before. You can download these in PDF form for easy access on a smartphone.
- I would advise setting up the sound when you do the camera check so you know it is all working (and all there!) – it’s just not worth the stress of trouble-shooting on location. See point 3 for more details on this.
- Format your cards. This will be in the menu section of the camera… on the XF305 it is called “initialise media”. There’s no shame in looking up how to do this.
- Check your settings. You should be shooting in 1080p or 1080i (1920 x 1080 pixels integrated or progressive). Integrated is usual for broadcast, progressive for internet. This should be visible on the display. The XF305 has a button called “status check” which will show you.
1: FIND YOUR LOCATION
- FILM INDOORS Generally you will want this interview to be as neutral as possible, so unless there is a compelling reason for an outdoor shot (for instance you are discussing the person’s love of gardening) film indoors. You have more control over the light and sound.
- BACKGROUND: If you are trying to get someone’s personality/job/status etc conveyed in the interview think about what is in the background. If they are a hoarder and that is part of the story think about having all their junk in the background (even if it’s out of focus it gives a style/feel to the interview). If they are an artist why not do it in their art studio with easels and paints in the background?
- LOOK /LISTEN CAREFULLY. Spend time choosing the room you will film in. Does it have any ambient noises? (beware fridges – and yes you can switch them off but remember to turn them on again!). Does it have a window as a light source? Can you control it with a blind or curtains?
- Take your time here getting it right! The window is your dominant light source, and should be in front of their face, but a little to one side, so you get a bit of modelling but no harsh shadows. Hold your hand up and look at it in a variety of places before seating your interviewee. You can use a white-board or a pop-up reflector to fill the other side with reflected light. Moving them closer of further from the window can have a dramatic effect, as can opening or closing the blind a little. TOP TIP: Look for a bright little point of light in their eyes… if you can’t see this then their face is poorly lit.
2: CHOOSE A SHOT.
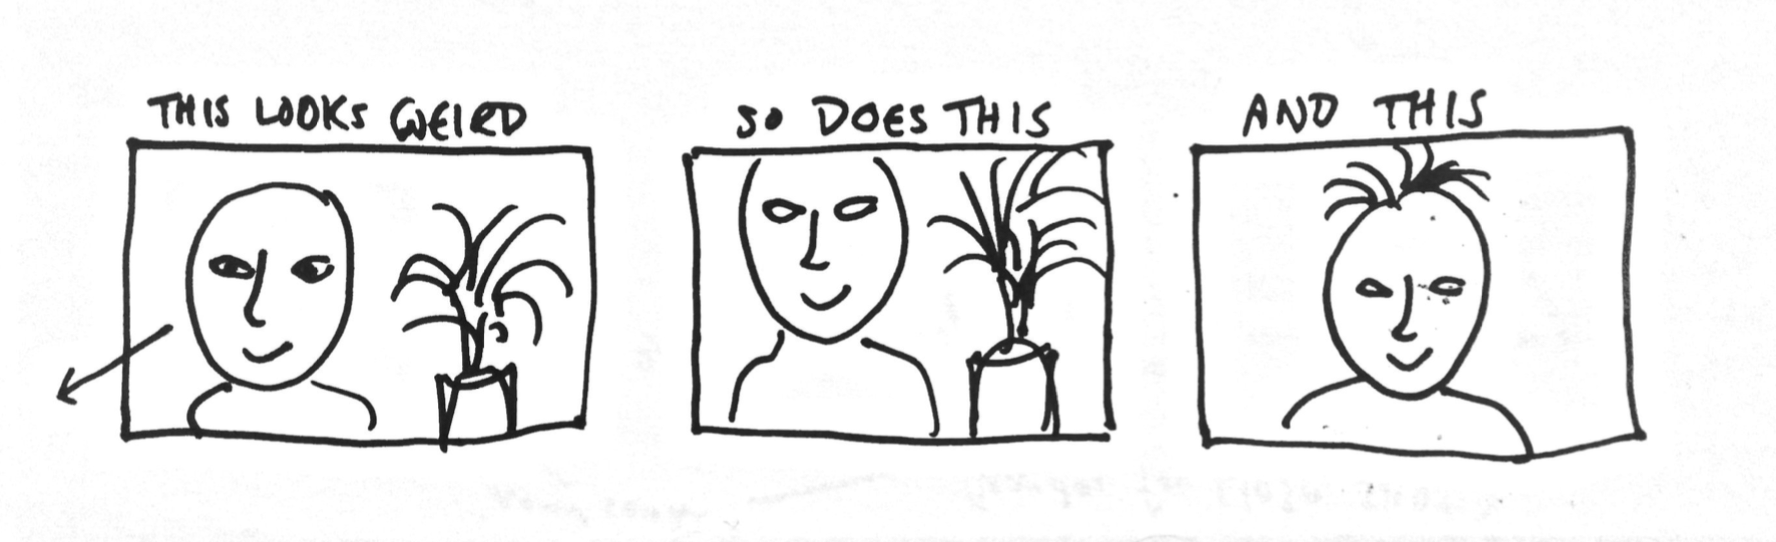
Ideally you want your contributor to be seated. They will be looking to the left or the right of the camera. The background won’t have a window in it if you can help it, and try not to have a plant sticking out of their head or light switch out of their ear. Neutral, with a bit of depth you can throw out of focus, and interesting shady-bits is perfect. Feel free to rearrange the room to your heart’s content to get this.
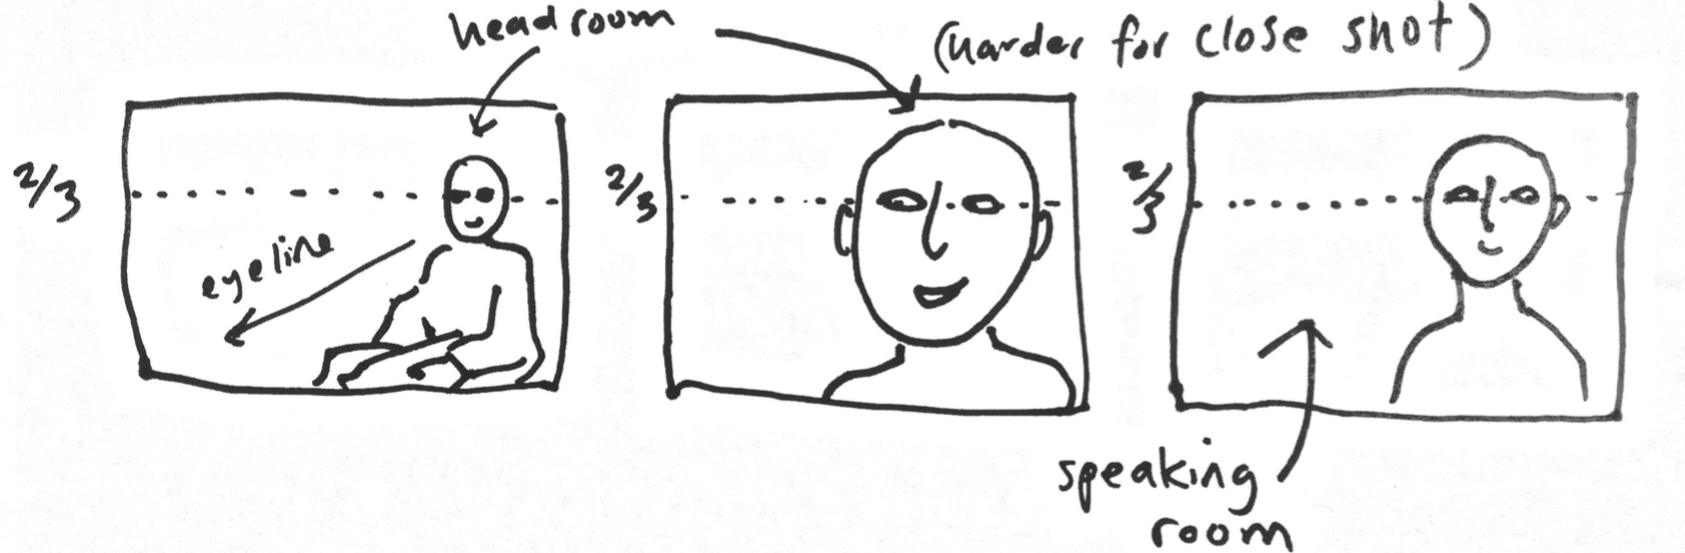
- EYE LINE:
 The camera lens should be level with the contributor’s eyes. The interviewer should be at the same level, so put a chair as close to the camera as possible, and just behind if you are operating. Put your hand where your face will be and get them to look at your hand while you fiddle with the camera and frame your shot. Explain that they will be looking at you – not the camera lens.
 - COMPOSITION: A basic rule of thumb is that your contributor’s eyes will be 2/3 of the way up the shot. In your main shot they will have “head-room” (space above their head) and they will be looking to one side or the other of the lens. Whichever way they are facing, there will be more space on that side of the shot than the other. This is called “speaking room”. In other words they will not be in the middle, and they certainly won’t have their nose up against the side of the shot and loads of space behind their head!
- SHOT VARIETY: In most cases you will need to provide your editor with at least 3 shot sizes. They should be similarly composed, but one wide, one medium and one tight. Choose them now. Check something odd doesn’t appear in the background when you go to the wide shot.
- DEPTH OF FIELD: Everyone wants to throw the background out of focus. This is pretty tricky without both the right lens and lots of space – but briefly this is how you do it: You need the shot to be quite dark, as the aperture (iris) of the camera will be as open as possible. Use an ND filter if you like. The camera needs to be as far away from the subject as the space allows, so that the shot is zoomed in. If possible the background needs to be dark and shady. I once worked with a very experienced Canadian crew who simply brought a projector and projected an out-of-focus background onto the back of the shot!
3: SOUND:
- ALWAYS USE HEADPHONES. There are volume buttons on the top of the XF305. Check they are at a proper level.
- Use a top-mounted shotgun mic as a back-up. Make sure it is set to PHANTOM POWER.
- RADIO MIC: Fix the receiver end of the radio mic to the camera and plug it in the other XLR input. Switch it on. Switch on the transmitter end and attach to the person you’re filming, clipping the power pack on their belt. Thread the wire under their shirt and clip at the neck or on a scarf / lapel. Check the sound, first by tapping each mic – you should hear the noise in each ear. Then if you are confident both mics are working correctly, get the interviewee to do a sound check. Their voice should be peaking at approx -12Db.
- IMPORTANT – I can’t stress how important it is to check the sound is working correctly. If something isn’t right – go through all the sound controls methodically – are the headphones set up correctly? Check the connections. Are you sure the camera isn’t set to “internal mic?” or “line” (a setting for taking sound from a sound desk), do both mics have power (+48v)? Most cameras, including the XF305 have audio controls in various places – Sound levels are accessible to your left hand, but then there are also settings around the XLR inputs. There are also settings you can check in the menu. Be aware of all of these.
- Lastly – make sure you listen! Check for random sounds in the room – radios or TVs, noisy fridges, children, snuffly dogs, close windows against oustide traffic. All of these can spoil a shoot. If you can’t remove the offending noise-maker at least get a couple of shots of the baby / dog so that you can visually explain it.
4: READY TO SHOOT?:
- EXPOSURE OR IRIS: Flick the camera onto auto exposure then back onto manual. Then take a look at what you’ve got. Switch on the zebras – depending on how they are set up they will show you where the shot is brightest. Check that it isn’t losing any detail on the bright bits. Then check the shadows. Can you see detail there? If it’s in the background that’s OK… if it’s on the face then it isn’t OK to lose detail.
- Gain: this is “digital light” and can reduce the quality of the shot if you use too much. It should be set to 800Db or less. On many cameras this will be “low” gain, but the actual values can be set in the menu..
- Shutter speed: Make sure this isn’t on auto (as the camera may automatically change the shutter speed and frustrate your attempt to control exposure). Set to 1/50 or 180 degrees.
- WHITE BALANCE: Take a white balance from a sheet of paper of white T-shirt near the contributor’s face.
- Make sure the tripod is loose (not locked off) as you will need to adjust it when you change the shot size.
- FOCUS: Focus manually on the fleck of light in their eye. Use “peaking” if you like.
5: START SHOOTING:
- Check the sound levels as you start, as many people speak at a different volume when “on camera”.
- Check they haven’t moved forward and that your focus is still true.
- Be aware that if you change the sound level or focus or framing while shooting you will have to redo that bit.
- Every time you ask a question, vary the shot size so you have some “cutting points”. Start on your main wide shot. Use the tighter shots for the more intimate questions.
GOOD LUCK!
© BOUNDARY PICTURES 2017